DIY Plumbing Blog | How to Clean a Drain Trap

How to Clean a Drain Trap
Clogged drains can quickly turn into a nightmare but sometimes they are a simple repair that you can do at home with just a few common household tools. Our plumbing repair specialists at Scott English Plumbing have put together this simple step by step guide on how to clean your drain trap. These steps will help you out so that the next time you are faced with a clogged sink you know exactly what to do.

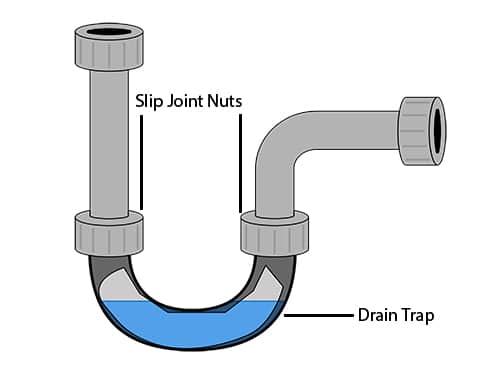
The first thing to know is that your drain trap is the curved pipe underneath the sink of your home. It’s shaped like the letter “J” and this unique shape makes it susceptible to clogs. It is the number one cause of most drainage issues with the build-up of debris, grease, hair, and soap scum. It’s good to keep your drain trap clean and clear because even a slightly clogged drain trap can lead to slow drainage.

If your home is currently experiencing slow drainage in a sink, we recommend clearing out your drain trap, in order to avoid a complete blockage. Make sure to remove everything underneath your sink so that you have a clear space to work. Then be sure to follow these steps:

  • Bucket: Place a bucket directly underneath your drain trap to catch any water that may fall when disassembling your plumbing pipes.
  • Disassemble: Remove the two coupling nuts that attach the trap to the sink tailpiece and to the neighboring wall fitting. If these nuts don’t move or easily fall apart when you attempt to move them, it’s time to get a replacement trap.
  • Clean & Clear Out: Clean the inside of your trap with either a large nylon bottle brush or a straightened wire coat hanger. Ensure that all of the parts are completely clean inside and outside. Even a small piece of debris stuck between a drain washer and your drainpipe can create a leak. We recommend using this opportunity to inspect all of your washers, they should be soft and flexible. If they happen to appear hard and crusty you will want to replace them.
  • Snake It Out: If you find that your drain trap is already clear and clean upon disassembling it, we recommend inserting a small retractable drain snake directly into the pipe of your wall. Work the snake around in and out rotating the handle clockwise.
  • Reassembly: Reassemble your drain trap. Be sure that each washer is properly seated because twisting can become an issue. Don’t over-tighten the connections at first, instead keep the coupling nuts at a hand-tight level. If a leak does happen, continue to tighten little by little until the leak stops. If an increased tightness fails, your washers may be dirty, twisted or defective. Then give it another try.


If your plumbing fixture remains clogged after all these steps then we recommend contacting one of our trusted plumbers at Scott English Plumbing. Our team of specialists have the skills and tools to handle any job. Give us a call today and we will send your worries down the drain.

How to Find a Water Leak

Leaky Faucet 
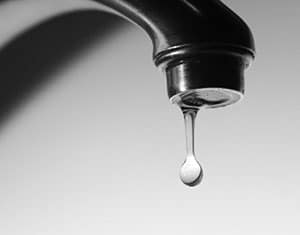
If you’ve noticed that your water bill is higher than you expected, but it seems like your water usage hasn’t changed then you likely have a leak somewhere on your property. Finding and fixing leaks can save you money and is also a great way to reduce water waste. With our tips, you’ll be a water leak detection expert in no time at all.

Determine if the Leak is Outside your House or Inside

Your first step should be determining if the leak is between your water meter and your house or somewhere else inside your home.

  • Start by shutting off the water supply to your home. The valve is usually located outside right next to the wall of your home.
  • Locate your meter head. If you can’t find it try digging around some with your hands as your meter head can get covered by dirt or grass.
  • Once you find it, and you’re sure that the water supply to the house is turned off, watch the meter and see if it is still turning.
  • If it’s not turning than the leak is inside the house and you can move on to one of the other sections of this page.
  • If the meter is still turning then there is a leak somewhere between the house and the meter or the shutoff valve to your house is leaking which is pretty common with old valves.
  • Walk the route that the water line takes from your meter to your house and keep an eye out for signs that there is a leak such as soft ground, muddy areas, or areas of grass that seems to be growing much faster than others. If you find anything like this chances are that you’ve found your leak.

Look for Dark Spots on Your Ceiling

If there are areas of your ceiling that are darker than the rest it could be a sign that bathroom faucets or toilets on the second floor of your home are leaking and seeping into the floor which will stain the ceiling on the first floor. Your first move should be to measure how far out from the wall of your home the center of the stain is. Stains on the ceiling are usually pretty close to the source of the leak and knowing how far out from the wall the leak is can help you determine where the source is when you investigate the second floor. Once you have your measurement, go upstairs and measure out from the same wall you did on the first floor and try to determine what drain or water line is closest. If your toilet is closest, check the water supply line to the toilet and the shutoff valve if your toilet has one. If a bathroom sink is closest check the supply lines in the cabinet underneath the sink as well as the drain pipes. Valves on supply lines occasionally fail and sometimes the solution is as easy as changing out the valve.

Check Irrigation Valves in Your Garden for Leaks

If you have a sprinkler system, walk the route that the lines would take and look for overly wet or muddy areas. Muddy areas could be an indicator that a pipe in the sprinkler system has cracked from age or burst from freezing and is dumping water. Check hose bibs as well and, if they are leaking, replace them. Even minor leaks will add up quickly over the course of the month and can cause significant rises in your water bill. Check out this drip calculator for an idea on just how much water a leaky faucet can waster per day.

Keep an Eye out For Signs of Slab Leaks

Sign of a slab leak
If you’ve noticed that areas of your flooring feel warmer or colder compared to the rest of the flooring in the room then your home could have a slab leak. Slab leaks should be dealt with as soon as possible as they can cause serious damage to your foundation and if left unattended can undermine your home. These types of leaks are much harder to pinpoint where they are, but keeping an eye out for temperature differences in the floor can help plumbers know where to look first. If you suspect you have a slab leak we recommend contacting a professional plumber to help locate and fix the leak as finding it on your own without specialized equipment would require tearing up flooring and breaking through your foundation at random and hoping you have the right spot.

How to Disinfect Your Dishwasher

Stainless steel dishwasher

Your dishwasher might be getting all the food off your dishes, but the inside could be covered in germs. While dishwashing detergent might be great at getting food off, it isn’t meant to sanitize anything. Luckily, with a few household products, you can disinfect your dishwasher and get rid of odors all in one shot.

Start by Disinfecting any Small Parts of your Dishwasher

Fill your sink up with hot soapy water. You can use dish soap, but a little antibacterial soap will help get rid of any germs that are hanging on. Take all of the removable components out of the dishwasher such as the utensil basket, any cup guards and even the drain filter is yours is easily removable. Scrub everything and replace it in the dishwasher.

Clean and Disinfect the Dishwasher Drain

Pull out and remove the bottom rack of your dishwasher. Check the drain for any food remains and clean them out if there are any. Food particles are a perfect breeding ground for germs and can contribute to bad odors in your dishwasher. Dip a sponge in soapy water and scrub the inside walls of the dishwasher, the sprayer, and heating element. If you’re having trouble getting the soap scum or food particles to come off then you can use some baking soda as a mild abrasive element to help the job along. Replace the dish rack once everything is clean.

Clean the Dishwasher Seals

You can use an old toothbrush to scrub the rubber seal around the door. Dip the toothbrush into some hot soapy water and scrub the seal until it’s clean again.

Use Vinegar or Powdered Laundry Bleach to Disinfect the Whole Dishwasher

It is very important that you never mix vinegar and bleach. If you do poisonous gasses will be created in your dishwasher. You can use either one to disinfect your dishwasher as long as you don’t use them together. It’s also important to note that if you have a stainless steel dishwasher you should not use bleach. The chlorine will erode the metal. If you decide to use vinegar pour 1 cup of distilled white vinegar into a glass or other dishwasher safe container and put the container in the top rack of the dishwasher. Run the dishwasher on a regular cycle with the hottest water possible. If using powdered laundry bleach, fill your detergent compartment with the powder and run the dishwasher through a regular cycle with the hottest water possible.

Need Help? Call Us!

Like any home repairs, if you feel uncomfortable performing these tasks it’s best to call a professional. If you get in over your head give us a call at (714) 987-9801 or (949) 293-2037

North Orange County
(714) 987-9801(714) 987-9801
South Orange County
(949) 293-2037 (949) 293-2037

Save Water With Updated Plumbing Fixtures

You wouldn’t throw money down the drain, would you? Unfortunately, that’s what using inefficient plumbing fixtures in your home is doing. Luckily, there are a lot of simple ways that you can save water and spend less on your water bill. With our 5 tips, you can have your home running efficiently and free up some money to spend on other things

Use Low Flow Aerators in Your Faucets

sink faucet aerator
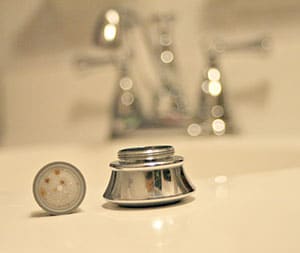
Low flow aerators are the easiest and fastest way to reduce your water consumption. You can replace your standard aerator with a low flow one for less than 5 dollars most of the time and removal and installation is really simple. The design of your aerator will vary, but it should look generally like the one pictured here. Merely unscrew your old aerator and install the new one and just like that you’re on your way to saving water and saving money.

Install Low Flow Shower Heads

Your current shower head likely uses anywhere from 2.5 gallons to 4 gallons of water per minute. Low flow or WaterSense labeled shower head only uses 2 gallons of water, which means that if your current fixture is on the higher end of the spectrum you could cut your shower water usage in half. Trimming down the water your shower uses means that you’ll be saving hot water which will lead to energy savings as well as savings on your water bill.

Change Out Your Old Faucets for WaterSense Rated Ones

WaterSense is an independent rating system for water fixtures that is approved by the EPA. WaterSense fixtures are guaranteed to use less water which means that you can be sure that the cost of installation will be offset by water savings further down the line. Not only are water efficient fixtures easy on the environment, but they’re easy on your budget too.

Repair Leaking Faucets and Pipes

Those minor leaks and drips add up over time and can cause water damage if left unattended. If you’re curious how much water you’re losing to a leaky faucet, this drip calculator shows how waste adds up over the course of a year. A leaky faucet is usually a pretty easy fix and can often be as simple as replacing a washer. Fixing pipes can be more involved and sometimes requires replacing entire sections of pipe, but both can save a lot of water and save you money on your water bill making them well worth the effort. If your comfortable with some of the less involved tasks listed here, but pipe replacement seems a little out of your range, then enlist the help of a professional plumber.

Ditch Your Old Toilet for a More Efficient Model

If your toilet was manufactured before the mid-’90s, it could be using anywhere from 3-7 gallons per flush. New efficient models only use 1.3 gallons per flush which amounts to huge water savings over the course of a year. Your toilet is likely stamped with a marking for how many gallons per flush it uses. Check it and see if you could save hundreds or even thousands of gallons per year by switching to an efficient fixture.

Need Assistance? Call Us!

We know that some tasks aren’t the easiest to do yourself. If you feel uncomfortable tackling any of these repairs, call us at Scott English and one of our licensed and insured plumbers can take care of it for you. We’re available for same day and emergency service and when you book with us you can be sure that the job will be done right the first time.

5 New Years Plumbing Resolutions

It’s resolution time! Maybe you’ve made resolutions to eat healthier or hit the gym, but what about resolutions to keep your home in top shape? With our New Years plumbing resolutions, you can change your habits and stop plumbing problems before they start. Start these changes today!

Use Drain Screens

One of the largest contributors to pipe blockages is hair. While you might not shed as much hair as your dog does, you are still losing hair every day. Shed hair easily makes it into your shower and bathroom sink drain and will never dissolve in water which means it’ll be in your pipes forever. Using a simple drain screen that you can pick up from a hardware store for less than five dollars a piece can keep hair out of your pipes and will keep your pipes flowing easily this year and beyond.

Watch What you Flush

Toilet clogs are one of the largest reasons our customers call us. Luckily, toilet clogs are mostly avoidable if you don’t flush anything that isn’t human waste or toilet paper. That means that those wipes labeled “flushable” should be kept away from your toilet as well. If you have kids, make sure to tell them that the toilet isn’t a good place for toys. That plastic dinosaur will cause blockages immediately.

Check your Water Heater

Water heaters are a serious home appliance but are often neglected when it comes to maintenance. You probably use your water heater every day which means that keeping it running well is essential. Make sure to regularly check your pressure relief valve and drain your water heater at least once a year to avoid sediment buildup. For more information on performing these tasks read here.

Watch Out for Signs of Hard Water

hard water shower head
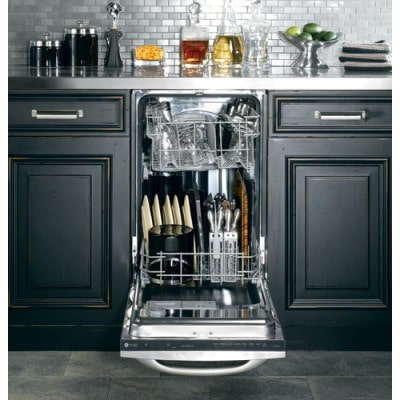
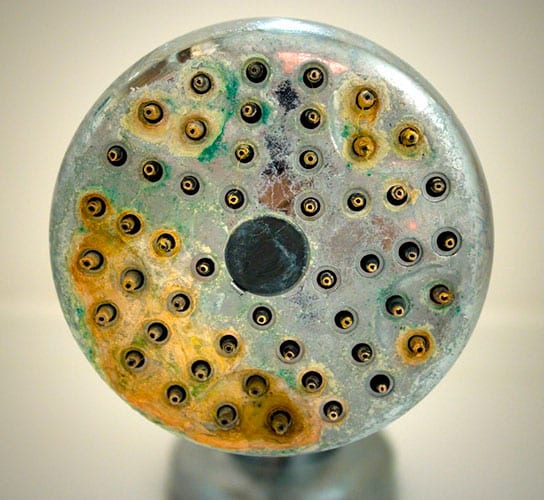
Keep an eye on the shower heads and faucets in your home. If they start looking like the one here it might be time to install a water softener in your home. Installing a water softener can avoid scaling on your fixtures and is easier on appliances like dishwashers.


Inspect Your Pipes for Signs of Corrosion

Many pipes rust from the inside out which makes inspecting from the outside difficult. Check your pipes for surface rust anyways though. If you notice that any of your pipes have rust on the outside then you should replace them before they rust through completely and cause flooding in your home.

Feeling Overwhelmed? Call a Professional!

If you don’t feel comfortable performing these tasks then it’s time to call a professional. Improper plumbing repair could cause serious problems and repair costs further down the line, but when you use a professional plumbing company you can be sure that your plumbing repairs in the New Year will be done right the first time.