DIY Garbage Disposal Installation

Are you after the convenience that only a quality garbage disposal can provide? Are you bold enough to do the installation on your own? If so, then these are the things that you should know about installing garbage disposals, step by step.
The Tools and Materials You’ll Need for DIY Garbage Disposal Installation
Of course, before you can do any installation, you need to prepare all the tools and materials that you will need apart from the garbage disposal unit itself. Doing so ensures that you can get the job done correctly and in the least time possible. Here are the things you need to prepare:
- PVC saw
- Screwdriver (flat head and Philips)
- Adjustable pliers
- Circuit tester
- Wide rubber band
- Plumber’s putty
- Wire nuts
- Electrical tape
- Electrical caps
- 20 Amp 120 Voltage Under-Sink Outlet
How to Install Your New Garbage Disposal
Although the installation is not as easy as you may want it to be, the good news is that by following a few simple steps, you will be able to install your garbage disposal unit competently. Follow this step by step process to prepare for garbage disposal installation:
 Cut power to the outlet your disposal will use. Shut it down by taking out the fuse at the electrical panel or by shutting down the circuit breaker that powers the plug.
- Uninstall the existing disposal, if there is one. Make sure that you clean the old putty from the area as well before putting in the new unit. The drain lines should also be disconnected completely. Our plumbers can do this for you if you’re not up to the task.
- Remove the old putty from the sink opening. Turn over the mounting assembly and loosen all the mounting screws to access the snap ring.
- With the use of a screwdriver pry the snap ring from the sink flange and separate the parts as the mounting assembly comes apart.
- Apply a generous amount of putty around the sink opening and slip the fiber gasket along with the metal backup ring over the flange.
- Put the mounting ring against the backup ring as you hold the fiber gasket in place. Use the wide rubber band around the flange to keep the parts in place.
- Slide the snap ring up the flange until you hear it pop in place. Tighten the mounting screws to hold the entire assembly in place against the sink.
- Knock out the plug and turn the unit on its side. Get the flathead screwdriver to push against the plug and allow it to go down the unit.
- Turn the disposal upright to remove the gasket and the ring. Turn the disposal upside down again to get the plug.
- Then turn the disposal upright again to replace the gasket and ring. Find the electrical hole to insert a wire clamp.
Before proceeding with the following steps, make sure that there is no power to the garbage disposal unit
 Remove the screw holding the access hole cover to be able to pull out the wires from the unit. Put the electrical wire into the clamp you installed earlier.
- Connect the wires using the same color combination: black-to-black and white-to-white. Make sure that the wires are secure before hooking up the ground wire.
- Push the wires into the access hole and put the cover back in place. Make sure that the cover is screwed on and tighten the electrical clamp.
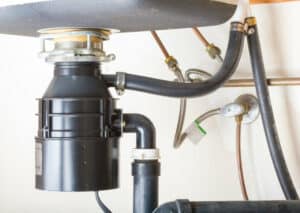
- Lift the unit into place and insert the top end of the mounting gasket into the assembly. Turn the lower mounting ring clockwise until the mounting tabs are snugly in place. Lock the tabs over the ridges with the use of a pair of adjustable pliers.
- Attach the P-trap to the trap arm and the tailpiece. The discharge tube should go into the T-fitting, but do not tighten the slip nut completely. The other end of the discharge tube should go into the disposal system. Take a screwdriver to secure the metal flange and tighten the slip nuts. Doing so completes the installation of the drain lines.
- The bell should go over the disposal drain and clamped in place. The disposal bell of the dishwasher should slide to the barbed connection of the disposal. Clamp the fitting securely with a screwdriver.
- Run water through to check for leaks in the system.
Contact Scott English Plumbing, Inc. for More Garbage Disposal Help and Information
You have just finished installing the garbage disposal unit. This should take you not more than a day to complete. Should you encounter to any problems with your plumbing, contact Scott English Plumbing immediately.
Remember that it is always best to call a plumber rather than to attempt to do this job on your own. As you can see, it’s a rather complex process that might be difficult to complete if this isn’t something you do every day. Call Scott English Plumbing to get help with your garbage disposal installation in Orange County. With more than 19 years of experience in the plumbing industry, they know everything there is to know about installing garbage disposal.
